
Using hooks, XTemplate, $cfg and localisation
| GHengeveld |
|
|---|---|
|
Category: Plugins
Type: Article, Reference guide Languages: English Contents:
Added 10 minutes later: I will do this as soon as I find the time for it. Added 9 hours later: Introduction So you want to write your own plugins? This guide will help you use the Cotonti plugins system. Cotonti (extended) plugins are normal PHP scripts, modified for use with the Cotonti CMS. Getting started The first step in the process of developing a plugin is setting up the directory structure and creating some default files. Your plugin directory structure should look like this: 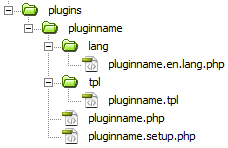 If the plugin you will be writing is not going to use template files and/or language strings, you are free to omit the respective folders. Your plugin name, when used as a filename or code, should:
All files inside your plugin folder (root) have a predefined code structure: <?PHP
/* ====================
[BEGIN_SED_EXTPLUGIN]
Code=pluginname
Part=main
File=pluginname
Hooks=standalone
Tags=
Order=10
[END_SED_EXTPLUGIN]
==================== */
/**
* Plugin description
*
* @package Plugin name
* @version 1.0
* @author You
* @copyright Your company
* @license BSD
*/
defined('SED_CODE') or die("Wrong URL.");
// Your plugin code
?>
The first thing you will notice is the presence of some setup values. These values are used by Cotonti to setup and configure your plugin when it is installed through the adminpanel. Code: the plugin name Part: the second part of the filename (example: ‘index’ for pluginname.index.php). default: main File: the filename without extension (example: pluginname.index) Hooks: Cotonti hook code, or ‘standalone’ for standalone pages Tags: list of tags using this format: file.tpl:{TAG_ONE},{TAG_TWO} Order: integer, default 10, order by which plugins are executed by a hook The following javadoc comment block is optional, but recommended. You are free to modify this to your liking. Finally, there is one line of code which is required for all your php files, as a security feature. It will prevent your file from being included (and executed) in non-Cotonti php files. Using and understanding hooks The Cotonti plugins system is based upon the simple principle of including blocks of code inside the core files. If you look into these core files, which are located in system/core/.../, you will find blocks of code like this: $extp = sed_getextplugins('index.main');
if (is_array($extp))
{ foreach($extp as $k => $pl) { include_once($cfg['plugins_dir'].'/'.$pl['pl_code'].'/'.$pl['pl_file'].'.php'); } }
The ‘index.main’ code is the unique hook code. The hook looks up a list of plugins using this hook code, and executes the corresponding plugin files with a simple include_once. Knowing this, you will be able to better understand the way your plugin works and interacts with the Cotonti core. You should treat the plugin code as if it were part of the core code, replacing the hook code. This means that you can use and modify core variables and use global Cotonti functions. This also means you can use the $usr[] variable for accessing data concerning the visitor, which is mostly useful for granting or denying access. The downside is that you need to be aware of naming conflicts. For example, most single character variable names are in use by the Cotonti core. This means it is not safe so use these variable names inside your plugin, because you might overwrite a system variable, introducing new bugs and errors. The order by which plugin files are included by a hook is defined by the plugin. In most cases it is okay to use the default value (10), but in some special cases you will want to have control over the order by which the plugin code is included. This will allow you to make two plugins successfully work together. The plugin with the lowest value will be included first.[/] Відредаговано: Koradhil (13.09.2009 01:09, 16 років тому) |
| Kingsley |
|
|---|---|
|
Nice man, this helps alot..
|
| GHengeveld |
|
|---|---|
|
Thanks. The rest of the guide will follow asap. I think the part about XTemplate is going to be especially useful.
Added 23 hours 49 minutes later: The XTemplate system Those familiar with building or modifying Cotonti templates will have seen and used template tags. Tags are short bits of code which, when parsed by XTemplate, are replaced by a block of HTML code. This ensures your template file exists only of HTML code. Any PHP generated code is handled by the plugin and parsed using a tag. When developing a plugin, it’s important to know how to define tags and conditional blocks with the XTemplate system. Before, most plugins used the legacy way of getting HTML to be parsed and displayed. Although using XTemplate and your own template file is a much nicer way to build your plugin, you can still use the classic way for standalone plugins. You do this by using the variables $plugin_title, $plugin_subtitle and $plugin_body. These are assigned automatically to the tags {PLUGIN_TITLE}, {PLUGIN_SUBTITLE} and {PLUGIN_BODY}. In this case, you don’t need to create your own template file (and you can omit the tpl directory). Cotonti will use the skin’s plugin.tpl instead. So you want to use your own template file. You start by defining the template file as a new XTemplate object. That’s right, the XTemplate system is an object oriented piece of code. Once you’ve created a new XTemplate object, you can use a collection of methods (functions) supplied by the XTemplate class. We will be using just two of them: assign() and parse(). First we create a new XTemplate object: $t = new XTemplate(‘path/to/skinfile.tpl’); We are using $t as the XTemplate object variable name, but you can use any variable name you like. The ‘path/to/skinfile.tpl’ is the path to the template file, from the Cotonti root folder. While this would work perfectly fine, it’s not a very flexible way to define the template file. Therefore we will use the sed_skinfile() function instead, like this: $t = new XTemplate(sed_skinfile('pluginname', true));
The first parameter is the filename without extension. The second parameter must be set to true, since we’re dealing with a plugin. The sed_skinfile() function will look up the correct path to the template file. The filename must always start with the pluginname. If you want to use multiple template files, you should use filenames like this: pluginname.secondary.tpl. Remember to omit the extension when using sed_skinfile(). The next step is to assign some tags to your template file. We do this by using the assign() method on our XTemplate object: $t -> assign(); The assign() method can take single tags or an array of tags: $t -> assign(“SINGLE_TAG”, ‘<p>Piece of HTML</p>’); $t -> assign(array( “TAG_ONE” => ‘<p>Piece of HTML</p>’, “TAG_TWO” => $somevariable )); As you can see, it’s very simple to assign a bunch of tags with PHP generated content. While it’s a good way to implement the MVC design pattern, it’s still not very flexible. What if you want to display multiple rows of content from your database? XTemplate uses HTML comments and the parse() method to allow this. Lets say you just executed an sql query to get all pages. Likely you’ll be using a while loop to go through the rows. Consider this code: while($row = sed_sql_fetcharray($sql))
{
$t -> assign(array(
“PAGE_ROW_ID” => $row[‘page_id’],
“PAGE_ROW_TITLE” => $row[‘page_title’]
));
}
This would redefine the tags every time we go through the while loop, and result in the tag to be set to the last row’s value. To prevent this, we need to force parsing the tags directly after defining them. This is achieved with the parse() method. $t -> parse(); The parse() method takes one parameter: the block code. The block code is a unique code that is placed inside the template file as an HTML comment. It always has a BEGIN and END, like this: <!-- BEGIN: BLOCK_CODE --> ... <!-- END: BLOCK_CODE --> You may have noticed that every Cotonti template file starts and ends with such a tag, effectively defining the entire document as a block. Usually this is the MAIN block, but you can use another if you really want to. In the plugin PHP code, we will now add the parse() method to the while loop: while($row = sed_sql_fetcharray($sql))
{
$t -> assign(array(
“PAGE_ROW_ID” => $row[‘page_id’],
“PAGE_ROW_TITLE” => $row[‘page_title’]
));
$t -> parse(“MAIN.PAGE_ROW”);
}
The block we’ve just defined is named ‘PAGE_ROW’, but because it is to be used within the MAIN block, we prepend the block name with the parent block name and a dot to separate them. Our template file could now look like this: <!-- BEGIN: MAIN -->
<h1>{SINGLE_TAG}</h1>
<!-- BEGIN: PAGE_ROW -->
<p>{PAGE_ROW_TITLE}</p>
<!-- END: PAGE_ROW -->
<!-- END: MAIN -->
If you don’t want or can’t use the MAIN block, you can replace it with another code. However, this will require you to do one more parse at the end of the plugin code. The MAIN block is automatically parsed by Cotonti, but any other blocks will need to be parsed manually by your plugin. Simply call the parse method again: $t -> parse(“ALTERNATIVE”); It’s best to do this right before the PHP ending tag. Відредаговано: Koradhil (09.09.2009 17:34, 16 років тому) |


