М помощью этого плагина вы сможете загрузить файлы, прикрепить их к какому-либо объекту Котонти (странице или теме форума), которые затем, будут выводиться как список для скачивания или галерея изображений.
Автор: Vladimir Sibirov (Trustmaster)
Благодарности: Pavlo Tkachenko (Dayver), Kabak (Kabak)
GitHub: https://github.com/Cotonti-Extensions/attach2
Этот раздел рассказывает об основных моментах использования плагина на страницах (pages) c минимальными изменениями сайта. Аналогично можно настроить его для применения с другими разделам сайта, как например темы форума или комментарии.
Все примеры указаны для стандартной темы оформления, вы можете изменить их для использования в своих.
Первое, что необходимо сделать это добавить файлы на страницу. Возможно вы предполагаете сделать это во время редактирования страницы, однако данный плагин позволяет сделать это во время просмотра страницы. Для этого добавим ссылку "Прикрепить файлы" в меню администрирования страницы, в швблон "page.tpl":
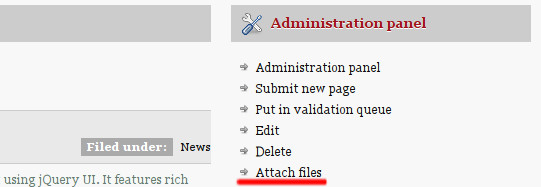
Для этого надо добавить следующий код в "page.tpl":
<!-- IF {PHP|cot_auth('plug', 'attach2', 'W')} -->
<li>{PAGE_ID|att_widget('page',$this,'attach2.link')}</li>
<!-- ENDIF -->
Эта ссылка будет видна только тем пользователям, которые имеют на прикрепление файлов (которое определяется правом «записи» (Write access) в настойках прав этого плагина).
Если нажать на ссылку "Прикрепить файлы", откроется следующего вида окно:
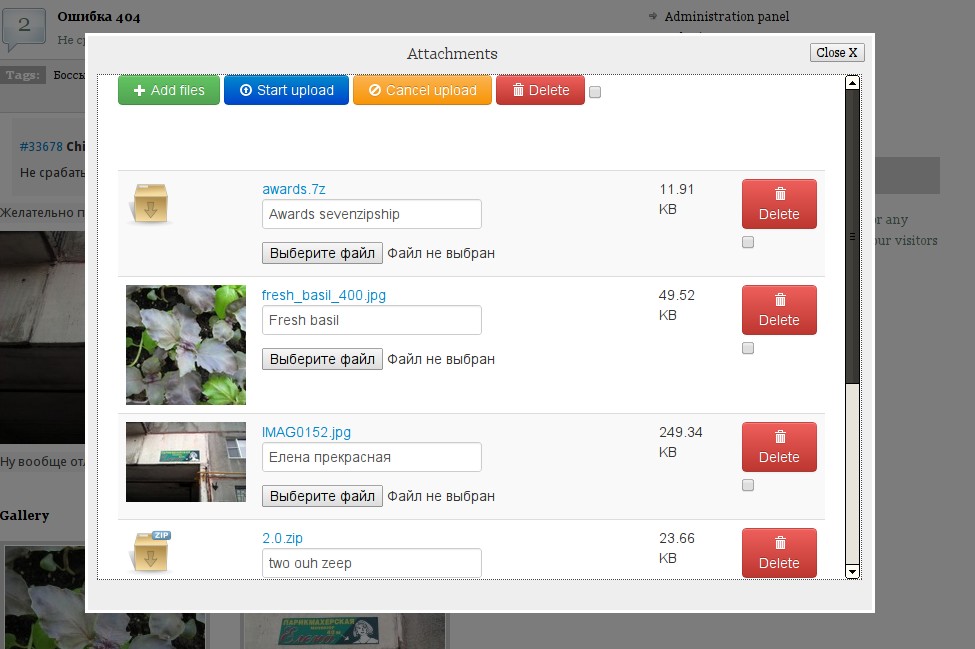
Интерфейс диалогового окна достаточно стандартен и понятен. Он позволяет выбрать один или несколько файлов за 1 раз, загрузить их, позволяет удалять загруженные, заменять файлы и редактировать описания посредством. Для настройки необходимой последовательности файлов просто перетаците соответствующую строку (Drag & Drop). После того как вы загрузили необходиомое и написали описания нажмите «закрыть», после чего содержимое страницы обновиться и вы увидите результат.
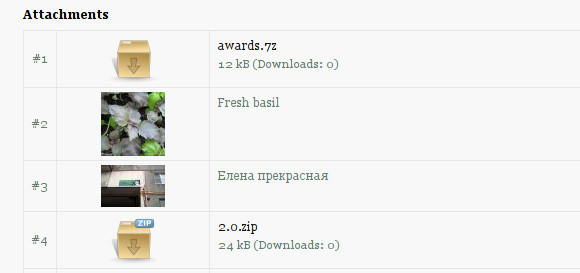
Самый простой способ вывода прикрепленных к странице файлов это использовать виджет att_display() в шаблоне "page.tpl":
<!-- IF {PAGE_ID|att_count('page',$this)} > 0 -->
<div class="block">
	<h3>{PHP.L.att_attachments}</h3>
	{PAGE_ID|att_display('page',$this)}
</div>
<!-- ENDIF -->
Который отобразит примерно следующее:
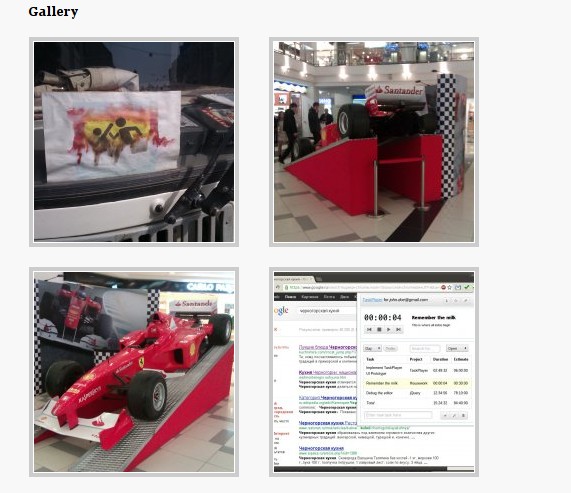
Одна из частых задач это размещение на страницах галереи фотографий. Вы можетет добавить простейшую галерею включив в шаблон "page.tpl" следующий код:
<!-- IF {PAGE_ID|att_count('page',$this,'images')} > 0 -->
<div class="block">
	<h3>{PHP.L.att_gallery}</h3>
	{PAGE_ID|att_gallery('page',$this)}
</div>
<!-- ENDIF -->
Он добавить Lightbox 2 галерею на страницу:
Еще одной растространненной задачей является добавление на страницу списка файлов для скачивания. Используйте функцию att_downloads() в своем шаблоне("page.tpl"):
<!-- IF {PAGE_ID|att_count('page',$this,'files')} > 0 -->
<div class="block">
	<h3>{PHP.L.att_downloads}</h3>
	{PAGE_ID|att_downloads('page',$this)}
</div>
<!-- ENDIF -->
Стандартный блок выглядит так:

Вставка стандартных блоков в шаблон дело не хитрое. Но если вы хотите использовать всю мощь плагина или более глубоко разобраться как он работает, этот раздел вам поможет.
Прикрепление файлов не ограничивается только страницами и стандартными шаблонами. Вы можете настроить прикрепление файлов и к другим объектам системы и настроить соответствующие им шаблоны. Давайте разберемся какие функции плагин предоставляет для использования в шаблонах и какие параметры им нужно передавать.
/**
 * Создает виджет загрузки/редактирования файлов.
 * Используется как функцию для вызова из шаблонов.
 * @param  string  $area    Код целевого модуля или плагина.
 * @param  integer $item    ID конкретного элемента (например страницы).
 * @param  string  $tpl     Код шаблона
 * @return string           HTML код виджета
 */
function att_widget($area, $item, $tpl = 'attach2.widget', $width = '100%', $height = '200')
Этот вызов используется для создание виждета прикрепления файлов и интеграции его внутрь содержимого вашего объекта (например страницы). В предыдущей главев мы использовали его для добавления на страницы ссылки «Прикрепить файлы» и кода виджета, редактируя при этом шаблон page.tpl. На самом деле эта функция шире, давайте взглянем на параметры:
For example, here is how you can add "Attach files" link for forum posts in "forums.posts.tpl" inside the FORUMS_POSTS_ROW block:
<!-- IF {FORUMS_POSTS_ROW_USERID} == {PHP.usr.id} -->
{FORUMS_POSTS_ROW_ID|att_widget('forums',$this,'attach2.link')}
<!-- ENDIF -->
/**
 * Renders attached items on page
 * @param  string  $area Target module/plugin code
 * @param  integer $item Target item id
 * @param  string  $tpl  Template code
 * @param  string  $type Attachment type filter: 'files', 'images'. By default includes all attachments.
 * @return string        Rendered output
 */
function att_display($area, $item, $tpl = 'attach2.display', $type = 'all')
This callback is used to display files already attached to an item. It can render them all within one stream or include a certain type of files only. The paramters are similar with other callbacks:
Here is how you can display all files attached to a forums post in "forums.posts.tpl" inside the FORUMS_POSTS_ROW block:
{FORUMS_POSTS_ROW_ID|att_display('forums',$this)}
/**
 * Returns number of attachments for a specific item.
 * @param  string  $area Target module/plugin code
 * @param  integer $item Target item id
 * @param  string  $type Attachment type filter: 'files', 'images'. By default includes all attachments.
 * @return integer       Number of attachments
 */
function att_count($area, $item, $type = 'all')
This callback returns the number of files attached to an item but it is often used to check whether there are files attached or not. Parameters are common:
Here is how you can use it to display attachments in "forums.posts.tpl" only if there are files attached:
<!-- IF {FORUMS_POSTS_ROW_ID|att_count('forums',$this)} > 0 -->
{FORUMS_POSTS_ROW_ID|att_display('forums',$this)}
<!-- ENDIF -->
/**
 * Renders images only as a gallery.
 * @param  string  $area Target module/plugin code
 * @param  integer $item Target item id
 * @param  string  $tpl  Template code
 * @return string        Rendered output
 */
function att_gallery($area, $item, $tpl = 'attach2.gallery')
This is a shortcut to att_display() using 'attach2.gallery' as $tpl by default and $type set to 'images'. By default it shows you how to make a simple gallery using Lightbox 2, but you can make your own template and use any gallery script you wish. Parameters:
E.g. let's imagine we've made our own template located in "themes/your_theme/plugins/attach2.fancy-gallery.tpl". Here's how we attach it to LIST_ROW block in "page.list.tpl":
{LIST_ROW_ID|att_gallery('page',$this,'attach2.fancy-gallery')}
/**
 * Renders files only as downloads block.
 * @param  string  $area Target module/plugin code
 * @param  integer $item Target item id
 * @param  string  $tpl  Template code
 * @return string        Rendered output
 */
function att_downloads($area, $item, $tpl = 'attach2.downloads')
Similarly to att_gallery(), this is a shortcut to att_display() using 'attach2.downloads' as $tpl by default and $type set to 'files'. It is normally used to provide downloadable files section. Parameters:
E.g. let's imagine we've made our own template located in "themes/your_theme/plugins/attach2.download-box.tpl". Here's how we attach it to a page in "page.tpl":
{PAGE_ID|att_downloads('page',$this,'attach2.download-box')}
function att_thumb($id, $width = 0, $height = 0, $frame = '')
This callback is mostly used in attach2 templates themselves. It generates a thumbnail for an image attachment and returns an URL to that thumbnail. The parameters are:
Thumbnails are generated on the fly and cached for futher use. Here is an example call from attach2.gallery.tpl:
<img src="{ATTACH_ROW_ID|att_thumb($this,200,200,'crop')}" alt="{ATTACH_ROW_FILENAME}" />
/**
 * Fetches a single attachment object for a given item.
 * @param  string  $area   Target module/plugin code.
 * @param  integer $item   Target item id.
 * @param  string  $column Empty string to return full row, one of the following to return a single value: 'id', 'user', 'path', 'filename', 'ext', 'img', 'size', 'title', 'count'
 * @param  string  $mode   One of these values: 'first', 'rand' or 'last'. Defines which image is selected.
 * @return mixed           Scalar column value, entire row as array or NULL if no attachments found.
 */
function att_get($area, $item, $column = '', $mode = 'first')
This function is used to get data for a single attachment per item. Its main purpose is to create page covers in category lists. Parameters are:
Here is an example of how this function can be used to turn a first attachment per page into clickable page cover thumbnails in "page.list.tpl":
<a href="{LIST_ROW_ID|att_get('page',$this,'path')}" title="{LIST_ROW_ID|att_get('page',$this,'title')}">
    <img src="{LIST_ROW_ID|att_get('page',$this)|att_thumb($this,240,160)}" alt="Foobar" />
</a>
As you see, this function can be used in conjunction with att_thumb() to generate thumbnails on the fly. The minimal Cotonti version for this feature to work is 0.9.12.
Images and thumbnails of the attachments can be pasted directly into content such as page_text, com_text, etc. However, you need to get the Attachment ID somehow first in order to paste it. The syntax of bbcode parameters is similar to URL query string. Available bbcodes are:
Usage example:
[att_thumb?id=15]
[att_image?id=11&width=320&height=240&alt=Picture description&class=foo]
These bbcodes work regardless of the parser being used, including HTML and Markdown. If you want to disable them, just Pause the attach2.parser part of this plugin in Administration / Extensions / Attachments.
There's a tool in Administration / Other / Attachments. It is used to purge files attached to items which don't exist anymore. Sometimes items are removed but the code removing linked attachmehts is missing, so this tool may help.
Тема на форуме для обсуждения и GitHub tracker сообщений об ошибках.


7 раз
I will try it, thanks!
279 раз
Good plugin, thanks.
Already using it. )))
5 раз
for some reason thumbnail page cover doesnt work for me
2 раза
В плагине предусметрена возможность установки максимального размера (px) картинки?
74 раза
Excellent plugin!
9 раз
Love the plugin so far.
Is there a way to limit the attachments per page.
I only see "Attachments per post (max.), 0 - unlimited:" and this does not effect on pages.
16 раз
Thnx :-)
Something wrong goes with the plugin on my pages. Instead of opening a new vindown this opens in page windows: http://s2.postimg.org/gfzje3jqx/Screenshot_from_2016_01_10_23_50_05.png
Then when i clikc image and upload it this appear: http://s2.postimg.org/k0vexboaf/Screenshot_from_2016_01_10_23_50_24.png
181 раз
kaossik, please open separate forum post to get any detailed help.
5 раз
Подскажите пожалуста как вывести миниатюрки с заданным размером в news.tpl ?