So you want to write your own extensions? This is the first in a series of articles to help you use the Cotonti modules and plugins system. Each article in the series will discuss a specific subject concerning plugin development.
The first step in the process of developing an extention is choosing what type you're going to develop. There are two types of extensions: modules and plugins. Modules are stand-alone applications within your website, such as forums, private messaging, file management and so on. Plugins are usually smaller and provide additional functionality. In short: plugins extend existing modules or core features, while modules add completely new stand-alone features to the system. In practice there is a very thin line between modules and plugins. They offer more or less the same possiblities, are developed in mostly the same way, and in some cases one could argue about the type of extension to choose. Here's an overview of criteria and differences, so you get a better idea of what type to choose:
| Module | Plugin |
| Provides stand-alone functionality | Extends existing module or core |
| Usually doesn't use many hooks | May consist of many parts, each hooking in in another area |
| Provides hooks for plugins | May provide hooks, but usually doesn't |
| More likely to have its own database tables | Doesn't normally use its own database tables. |
| Can have custom permissions for contained items | Permissions are set for enitre plugin |
| Can have its own structure in site's categories tree | Doesn't have own categories |
In some specific cases you will be forced to use a module, since plugin loader provides limited flexibility. For example, if you want to bypass Cotonti's common.php (which handles user authentication, the database connection etc.) you will have to use a module so you can use your own version of common.php.
Remember that there is no golden rule here. You are free to choose what type you want. Right now there isn't much difference as far as coding style and flexibility goes, however this may change in the future.
Next step is setting up the directory structure and creating some default files. Modules go in the 'modules' directory, while plugins (you guessed it) go in the 'plugins' folder. Your directory structure should look like this: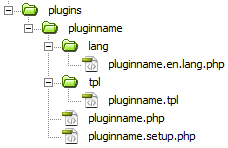
If the extension you will be writing is not going to use template files (tpl), setup scripts (setup) and/or language strings (lang), you are free to omit the respective folders. If you want to get started really fast, it's often easiest to copy another plugin (preferable one of some quality) and modify that.
Your extension code ('myext' in the example) should:
It is not allowed to use the same extension code for both a module and a plugin because it may cause conflicts between the plugin and the module.
All files inside your extension folder have a predefined code structure:
<?php

/* ====================
[BEGIN_COT_EXT]
Hooks=standalone
[END_COT_EXT]
==================== */

defined('COT_CODE') or die('Wrong URL.');

// Your plugin code

?>
The first part contains details used by Cotonti to setup the extension when it's installed through the admin panel. While in previous Cotonti releases there were much more values, in Siena only Hooks is required for your regular extension files. Hooks is a comma-separated list of system hook names. This determines the location where your code will be included. Usually you use only one hook for each file. If you specify 'standalone' as hook (for plugins only), the code will be executed when you call the plugin using index.php?e=myext. However, if the core of your plugin uses the 'standalone' hook, you should consider writing a module instead.
Every extension must have a setup file. This file specifies the plugin details as displayed by the admin panel. The file must be named like myext.setup.php (where myext is the extension code) and look like this:
<?php

/* ====================
[BEGIN_COT_EXT]
Code=myext
Name=My Extension
Description=This is my first Cotonti extension
Version=1.0
Date=2011-01-31
Author=You
Copyright=Your company
Notes=
Auth_guests=R
Lock_guests=W12345A
Auth_members=RW
Lock_members=12345
[END_COT_EXT]

[BEGIN_COT_EXT_CONFIG]
config_name=01:string::Default value:Description
[END_COT_EXT_CONFIG]
==================== */

/**
 * This is my first Cotonti extension
 *
 * @package My Extension
 * @version 1.0
 * @author You
 * @copyright Your company
 * @license BSD
 */

defined('COT_CODE') or die('Wrong URL.');

?>
The configuration format is described here.
A module always comes with a main part which is an entry-point. It is located in the module's folder and is called like myext.php. Similarly to 'standalone' parts of plugins, main module part is called when accessing index.php?e=myext. But it gives you more freedom in settting the script environment than standalone plugins. An entry-point script usually looks like this:
<?php
/* ====================
[BEGIN_COT_EXT]
Hooks=module
[END_COT_EXT]
==================== */

/**
 * My Extension
 *
 * @version 1.0
 * @author You
 * @copyright Your Company
 */

defined('COT_CODE') or die('Wrong URL.');

// Environment setup
define('COT_MYEXT', TRUE);
$env['location'] = 'myext';

// Load module functions
require_once cot_incfile('myext', 'module');

// Your code here
?>
You have full flexibility here to handle incoming requests the way you want to. Often you will use a switch to determine what part of the module to load. If you do that it's recommended to use the cot_incfile function as shown above. You can specify a third parameter in cot_incfile to load a specific file from modules/myext/inc/. The default value is 'functions', which will load modules/myext/inc/myext.functions.php.


You guys rock ! Congrats for your open source solution this is great. I finished the install part and I will start to develop some plugins and modules soon, thanks for your 1st tutorial it is presious help for a newbie like me.
181 tijden
Some tutorial [in russian] you can find here: forums?m=posts&q=7887
Пошаговая инструкция по созданию плагина от одного из пользователей: forums?m=posts&q=7887