Несколько тегов, разделённых запятой, означают логическое И между ними. Вы также можете использовать точку с запятой в качестве логического ИЛИ. И имеет высший приоритет над ИЛИ. Вы не можете использовать скобки для группировки условий. Звёздочка (*) внутри тега используется в качестве маски для "подстроки".
Разделы: Документация / Расширяем Cotonti / Расширения
Каждый, кому приходилось создавать или изменять шаблоны Cotonti, видел и использовал шаблон теги. Теги - это короткие кусочки кода, которые при разборе (парсинге) системой XTemplate, замененяются на блок HTML-кода. Это обеспечивает существование файла шаблона только в виде HTML-кода. Любой код, сгенерированный PHP, поддерживается с помощью плагина и анализируется с помощью тега.
При разработке плагина, важно знать, как определять теги и условные блоки в системе XTemplate. Раньше большинство плагинов использовали обычный способ получения HTML для разбора и отображения. Хотя использование XTemplate и свой собственный файл шаблона гораздо приятный способ построить свой плагин, вы все еще можете использовать классический способ для standalone плагинов. Это можно сделать с помощью переменных $plugin_title, $plugin_subtitle и $plugin_body. Они автоматически присваиваются тегам {PLUGIN_TITLE}, {PLUGIN_SUBTITLE} и {PLUGIN_BODY}. В этом случае, вам не нужно создавать свой собственный файл шаблона (и вы можете не включать tpl каталог). Cotonti будет использовать plugin.tpl из скина взамен него.
Итак, вы хотите использовать свой собственный файл шаблона. Вы начинаете с определения файла шаблона в качестве нового объекта XTemplate. Это верно, система XTemplate является объектно-ориентированной частью кода. После того как вы создали новый объект XTemplate, вы можете использовать набор методов (функций), поставляемых с классом XTemplate. Мы будем использовать только два из них: assign() и parse(). Сначала мы создаем новый объект XTemplate:
$t = new XTemplate(‘path/to/file.tpl’);
We are using $t as the XTemplate object variable name, but you can use any variable name you like. The ‘path/to/file.tpl’ is the path to the template file, from the Cotonti root folder. While this would work perfectly fine, it’s not a very flexible way to define the template file. Therefore we will use the cot_tplfile() function instead, like this:
$t = new XTemplate(cot_tplfile('pluginname', 'plug'));
Первым параметром является имя файла без расширения. Второй параметр должен быть установлен в 'plug', поскольку мы имеем дело с плагином. Другие возможные значения 'module' и 'core'.Функция cot_tplfile() будет искать правильный путь к файлу шаблона. Имя файла всегда должно начинаться с pluginname. Если вы хотите использовать несколько файлов шаблонов, вы должны использовать имена вроде этого: pluginname.secondary.tpl. Не забудьте опустить расширение при использовании cot_tplfile().
Следующим шагом является назначение некоторых тегов в шаблоне файла. Мы делаем это с помощью метода assign() нашего объекта XTemplate:
$t->assign();
Метод assign() может может принять один тег или массив тегов:
$t->assign('SINGLE_TAG', '<p>Piece of HTML</p>'); $t->assign(array( 'TAG_ONE' => '<p>Piece of HTML</p>', 'TAG_TWO' => $somevariable ));
Как вы можете видеть, очень просто назначить кучу тегов сгенерированного PHP контента. Хотя это хороший способ для реализации шаблонов дизайна MVC, но не очень гибкий. Что делать, если вы хотите отобразить несколько строк контента из базы данных? XTemplate использует HTML-комментарий и метод parse(), чтобы позволить это. Допустим, вы только что выполнили SQL запрос, чтобы получить все страницы. Скорее всего, вы будете использовать цикл while для прохода по строкам. Рассмотрим следующий код:
while($row = $sql->fetch()) { $t->assign(array( 'PAGE_ROW_ID' => $row['page_id'], 'PAGE_ROW_TITLE' => $row['page_title'] )); }
Этот код позволяет переопределять теги в каждой итерации цикла while, и в результате теги будут установлены в значение последней строки. Чтобы предотвратить это, мы должны заставить разбирать теги непосредственно после их определения. Это достигается с помощью метода parse().
$t->parse();
Метод parse() принимает один параметр: блок кода. Блок кода является уникальным кодом, который находится внутри файла шаблона в виде HTML комментариев. Он всегда содержит BEGIN и END, как здесь:
<!-- BEGIN: BLOCK_CODE --> ... <!-- END: BLOCK_CODE -->
Возможно, вы заметили, что каждый файл шаблона Cotonti начинается и заканчивается таким тегом, фактически определяющим весь документ в виде блока. Как правило, это блок MAIN, но вы можете использовать другой, если вы действительно хотите этого.
В PHP-коде плагина мы добавим метод parse() к циклу while:
while($row = $sql->fetch()) { $t->assign(array( 'PAGE_ROW_ID' => $row['page_id'], 'PAGE_ROW_TITLE' => $row['page_title'] )); $t->parse('MAIN.PAGE_ROW'); }
Только что определенный блок называется ‘PAGE_ROW’, а поскольку он будет использоваться в блоке MAIN, мы добавляем блок с названием родительского блока и точку, чтобы разделить их. Наш шаблон может выглядеть следующим образом:
<!-- BEGIN: MAIN --> <h1>{SINGLE_TAG}</h1> <!-- BEGIN: PAGE_ROW --> <p>{PAGE_ROW_TITLE}</p> <!-- END: PAGE_ROW --> <!-- END: MAIN -->
Если вы не хотите или не можете использовать блок MAIN, вы можете заменить его на другой код. Однако это потребует от вас сделать еще один разбор в конце кода плагина. Блок MAIN автоматически анализируется Cotonti, но любой другой блок должен быть обработан вручную вашим плагином. Просто вызовите метод parse() снова, и, наконец, выведите блок (для standalone):
$t->parse('ALTERNATIVE'); $t->out('ALTERNATIVE'); // Only for standalone
Лучше всего делать это непосредственно перед закрывающим тегом PHP.
Разделы: Documentation / Extending Cotonti / Themes
This document covers features, statements and their syntax supported by CoTemplate v.2.7 and later.
Blocks are the largest elements in the template's structure. Templates consist of blocks, blocks consist of other blocks, statements, tags and raw text. Here is the block syntax:
<!-- BEGIN: BLOCK_NAME --> Block HTML contents here <!-- END: BLOCK_NAME -->
Most templates have one root-level block named MAIN, but multiple root-level blocks in one template file are allowed. HTML outside the root-level blocks is ignored.
Block names are given in upper case. This is a common rule.
Blocks are triggered and pushed to output by controller PHP code. Blocks can be referenced by their full name, e.g. 'PARENT_BLOCK.BLOCK_NAME'. And blocks are slightly faster than other statements. These 3 facts make them fundamental building blocks in CoTemplate.
Variables in CoTemplate are called TPL Tags or just Tags. There are 2 kinds of tags depending on their scope: local tags and global tags.
Local tags are assigned with XTemplate::assign() method in controller PHP code. Their syntax is:
{TAG_NAME}
Such a statement will be substituted with current value of a locally assigned variable in the XTemplate object with name 'TAG_NAME'. Local tag names are given in upper case, this common rule allows us to distinct TPL tags quite easily from the other code.
Global tags are just global PHP variables, they have PHP keyword in their name:
{PHP.my_var}
Although it is recommended to use local tags for most of the output, global tags are used to output global variables which are available in many blocks and templates or to compensate the lack of a specific local tag.
Tags can be used to access arrays and objects with public properties. Dot notation is used to specify array keys or property names:
{ARRAY_TAG_NAME.array_key_name} {OBJECT_TAG_NAME.object_property_name} {PHP.global_var_name.key_name}
Arrays/objects can be nested. The same notation is used to access nested elements:
{TAG_NAME.level1_key.level2_key}
There is no limit on nesting level, but the deeper the level, the slower such a tag works.
Callbacks provide the way to process data with some functions before output. Pipe character is used to separate callback from the tag being processed:
{TAG_NAME|function_name}
This will be substituted with the result of function 'function_name' called on the value of tag 'TAG_NAME', where 'function_name' is the name of any valid PHP function that takes 1 string argument and returns a string value, including built-in PHP functions and user functions.
If there are more than 1 argument, braces can be used to specify them. The syntax is similar to PHP function call, but arguments are literals, except for the special keyword $this, which is replaced with the current value of the tag or a previous callback result:
{MY_TAG|substr($this, 3, 5)}
Multiple callbacks are supported, the result of the previous callback is "piped" to the next callback. Example:
{MY_STRING|str_replace('foo', 'bar', $this)|htmlspecialchars}
Callbacks and array/object access can be mixed together:
{MY_TAG.item1|do_something|mb_strtoupper}
Global tags are processed with callbacks too. There is a special use of global tags + callbacks which allows you to invoke PHP functions without processing any actual tags:
{PHP|my_function_call('some_data', 10)}
It is not recommended to turn your TPL files into PHP spaghetti, so use them carefully.
FILE statements are used to include TPL files within other TPL files. The syntax is:
{FILE "path/to/file.tpl"}
The path is relative to the root of your website. You can use TPL tags within the path, e.g.:
{FILE "{PHP.cfg.plugins_dir}/{PHP.theme}/something.tpl"}
Inclusion is performed quite literally: the contents of the given file are inserted exactly in the place of the FILE statement before any further parsing/processing of the current template.
IF statements are used to render parts of the template depending on logical conditions at run-time. IF statements are also known as conditional or logical blocks. A simple IF statement syntax:
<!-- IF expression --> some HTML/TPL code here <!-- ENDIF -->
The contents of the logical block is rendered if the expression evaluates to TRUE. The syntax of expressions is similar to PHP comparison and boolean expressions and may consist of TPL tags, literals, operators and parenthesis. The list of all supported operators is avialable here.
IF/ELSE syntax is also supported:
<!-- IF {FOO} > 10 AND ({PHP.bar} OR {BAZ} ~= 'boo') --> This is rendered if the condition is TRUE. <!-- ELSE --> This is rendered if the condition is FALSE. <!-- ENDIF -->
Conditional blocks may contain other blocks, other IF and FOR statements, tags, FILE statements and raw HTML.
FOR statements are used to iterate over the data which doesn't have any special iteration blocks provided. The most generic syntax is:
<!-- FOR {VALUE} IN {MY_ARRAY} --> Some use of {VALUE} <!-- ENDFOR -->
or
<!-- FOR {KEY}, {VALUE} IN {MY_ARRAY} --> Some use of {KEY} and {VALUE} <!-- ENDFOR -->
Where 'MY_ARRAY' is the name of the tag which contains the actual data which is being looped over. 'KEY' and 'VALUE' are the names of the tags which are used to access array elements inside the loop; {VALUE} represents the value of the current item, {KEY} represents a string or an integer key of the item within the array.
Callbacks can be used to provide almost limitless looping and processing possibilities. Below some common examples are represented.
<ul> <!-- FOR {KEY}, {VALUE} IN {MY_ARRAY} --> <li><strong>{VALUE.title}: </strong> <input name="{KEY}" type="text" value="{VALUE.text|htmlspecialchars}" /></li> <!-- ENDFOR --> </ul>
Traditional loop within an integer range:
<!-- FOR {INDEX} IN {PHP|range(1,10)} --> {INDEX}<!-- IF {INDEX} < 10 -->,<!-- ENDIF --> <!-- ENDFOR -->
Loop from 10 downto 2 with a negative step of -2:
<!-- FOR {NUM} IN {PHP|range(10, 2, -2)} --> {NUM}<br /> <!-- ENDFOR -->
FOR loops may conatin other nested FOR loops, IF statements, FILE includes, blocks, tags and raw HTML data.
Key and value tags are assigned in the common tag scope. There is no stack/scoping in CoTemplate.
Разделы: Documentation / Extending Cotonti / Themes
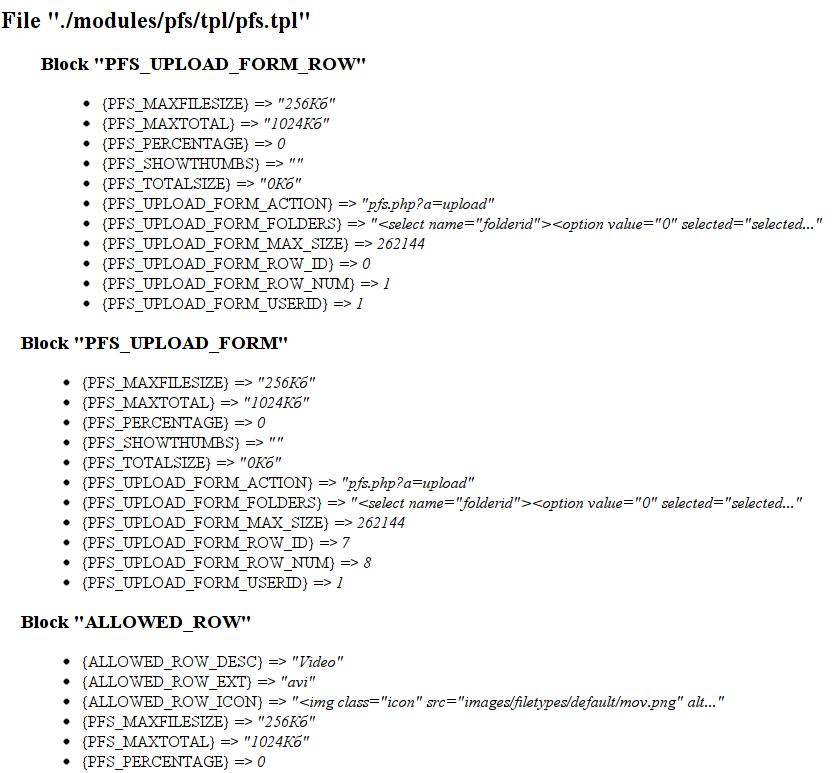
Since Cotonti 0.9.1 a new set of debugging facilities is available to template designers.
The first one is block/tags listing mode. It outputs a plain tree of blocks and assigned tags in them for the current page. Example:
To get such a debug page, you need to make sure debug_mode is enabled for your Cotonti instance first. Open datas/config.php and make sure you have debug_mode enabled:
$cfg['debug_mode'] = TRUE;
Then you can see a TPL dump of any page by simply appending tpl_debug=1 parameter to the URL of the page, e.g.
There are several notes about TPL Debug functioning:
Another useful feature which is now available is variable dumps. To see a dump of the variable instead of its content, you add special dump()
callback to it using a pipe sign, e.g.
{MY_TAG|dump} {PHP.usr.profile|dump} or even {PHP|dump}
For example, if you place {PHP.out|dump} in header.tpl, you will see somewhat like this:
And finally, one of the most frequently asked questions:
Разделы: Documentation / Extending Cotonti / Themes
CoTemplate is a template engine allows you to store HTML code separately from your PHP code (as opposed to many other template engines, like Samrty do). CoTemplate based on XTemplate class — a fast and lightweight block template engine, but extends it with many useful features such as nested blocks, various kinds of variable interpolation, callbacks, etc. and still is very short and very optimized.
CoTemplate is using blocks for outputting HTML code. You can think of them as instructions to Cotonti where to output the specific code.
Block syntax
<!-- BEGIN: XXX --> Your code here <!-- END: XXX -->
<!-- BEGIN: XXX -->
This defines the beginning of the block, and also tells Cotonti how and when to output your code (an example below will hopefully make this clear for everyone)
"Your code here"
Pretty self explanatory, you can insert your HTML code (divs, tables, etc) and Tags ( visit TPL Tags Repository for more info)
<!-- END: XXX -->
Defines the end of block, after this block, Cotonti stops outputting your code
XXX
Cotonti defined code, you can find the codes in any .tpl file.
Example:
<!-- BEGIN: PAGE_FILE -->
<br /><br /><hr />
<div class="pageBody">
<div class="pageTop"></div>
<div class="pageText">
<!-- BEGIN: MEMBERSONLY -->
{PAGE_FILE_ICON} {PAGE_SHORTTITLE}<br/>
<!-- END: MEMBERSONLY -->
<!-- BEGIN: DOWNLOAD -->
{PAGE_FILE_ICON}<a href="{PAGE_FILE_URL}">{PHP.L.Download}: {PAGE_SHORTTITLE}</a><br/>
<!-- END: DOWNLOAD -->
{PHP.themelang.page.Filesize}: {PAGE_FILE_SIZE}{PHP.L.kb}, {PHP.themelang.page.downloaded} {PAGE_FILE_COUNT} {PHP.themelang.page.times}
</div>
</div>
<!-- END: PAGE_FILE -->
<!-- BEGIN: PAGE_FILE --> instructs Cotonti to output (display it to user) the code below if page has "File Download : Yes" and "URL" of file is entered.
If "File Download:" is set to "No", Cotonti will skip to the end of <!-- END: PAGE_FILE --> and simply continue reading the code after that ending tag (without displaying the code between <!-- BEGIN: PAGE_FILE --><!-- END: PAGE_FILE --> to user).
Image 1. File download is set to No..
Image 1.1 ... link for download won't be displayed on page
Image 2. File download is set to Yes and URL of file is entered...
Image 2.1 ... and now can see the link and download the file
You can think of Blocks as "case logic", and that's pretty much correct as CoTemplate also supports "IF-ELSE" statements, but blocks are also used for defining the beginning and the end of theme parts (template blocks).
Example:
<!-- BEGIN: HEADER --> <!-- END: HEADER --> <!-- BEGIN: MAIN --> <!-- END: MAIN --> <!-- BEGIN: FOOTER --> <!-- END: FOOTER -->
NOTE! that blocks are case sensitive! e.g.
<!-- BEGIN: HEADER -->
This is valid block!
<!-- END: HEADER -->
<!-- begin: header -->
This is NOT a valid block!
<!-- end: header -->
CoTemplate has disk cache feature. It's an internal cache of CoTemplate and reserved only for it.
If you don't see changes on your site, even though you uploaded modified .tpl file back to server, you will need to clean your "Disk cache" to see the template changes.
Simply go to Administration → Other → Disk cache and clean the cache by clicking on "Purge all". Now you will be able to see the changes you made in your .tpl files.
CoTemplate supports IF-ELSE statements (logic blocks). Let's see it i details.
First we have to understand what is logic block, and what is supported by new CoTemplate.
Logic block:
<!-- IF <if_statement> -->
this will display if <if_statement> is true
<!-- ENDIF -->
For <if_statement> you can use TPL tags or Global tags.
Examples:
<!-- IF {PHP.usr.profile.user_name} == "admin" -->
hello admin !
<!-- ENDIF -->
<!-- IF {PAGE_DESC} == "" -->
Description of this page is empty
<!-- ENDIF -->
<!-- IF {PAGE_DESC} == {PAGE_TITLE} AND {PAGE_COMMENTS_COUNT} > 0 -->
There is some comments here.
And title and description of this page are equal.
<!-- ENDIF -->
Blocks are NOT space sensitive! e.g.
<!-- IF {PAGE_COMMENTS_COUNT} > 0 -->
This is valid block!
<!-- ENDIF -->
<!--IF {PAGE_COMMENTS_COUNT} >0-->
This is also valid block!
<!--ENDIF -->
Logical expressions are limited functionality. Supported logical operators are: AND, OR (AND has higher priority). Parenthesis is not supported. Supported comparison operators are: ==, !=, <, >, <=, >=, !. First operand of comparison must be a template variable e.g. {PHP.my.test}. Second operand may be a template variable, a number or a quoted string.
Example:
<!-- IF {USER_DETAILS_NAME} == 'Mark' AND {PHP.g} >= 6 OR !{PHP.error_string} -->
<div>The expression is true!</div>
<!-- ELSE -->
<div>The expression is false!</div>
<!--ENDIF-->
Nested logical blocks ARE supported, e.g.
<!-- IF {PHP.foo} == 'test' -->
<!-- IF {PHP.bar} -->
<div>This block is invalid!</div>
<!-- ENDIF -->
<!-- ENDIF -->
Template blocks inside of logical blocks ARE supported, e.g.
<!-- IF {PHP.foo} == 'test' -->
<!-- BEGIN: BAR -->
<div>This block is invalid!</div>
<!-- END: BAR -->
<!-- ENDIF -->
This is something you can see on almost every Wordpress blog. Comment is styled different if the comment author is also the page owner.
The regular comment styling in sed-light theme looks like this:
comments.tpl:
<!-- BEGIN: COMMENTS_ROW -->
<span class="title">
<a href="{COMMENTS_ROW_URL}" id="c{COMMENTS_ROW_ID}"><img src="themes/{PHP.theme}/img/system/icon-comment.gif" alt="" /> {COMMENTS_ROW_ORDER}.</a>
{PHP.themelang.comments.Postedby} {COMMENTS_ROW_AUTHOR}</span> {COMMENTS_ROW_DATE} {COMMENTS_ROW_ADMIN} {COMMENTS_ROW_EDIT}
<p>{COMMENTS_ROW_TEXT}</p>
<hr />
<!-- END: COMMENTS_ROW -->
And we can make it look like this:
by simply editing comments.tpl and inserting some logic blocks.
Here's the code:
<!-- BEGIN: COMMENTS_ROW -->
<!-- IF {COMMENTS_ROW_AUTHORID} == {PHP.pag.page_ownerid} -->
<div style="background-color:#C8D9E2; padding: 10px;">
<span class="title">
<a href="{COMMENTS_ROW_URL}" id="c{COMMENTS_ROW_ID}"><img src="{PHP.usr.profile.user_avatar}" width="20" height="20" alt="" /> {COMMENTS_ROW_ORDER}.</a>
{PHP.themelang.comments.Postedby} {COMMENTS_ROW_AUTHOR}</span> {COMMENTS_ROW_DATE} {COMMENTS_ROW_ADMIN} {COMMENTS_ROW_EDIT}
<p>{COMMENTS_ROW_TEXT}</p></div><hr />
<!-- ELSE -->
<span class="title">
<a href="{COMMENTS_ROW_URL}" id="c{COMMENTS_ROW_ID}"><img src="themes/{PHP.theme}/img/system/icon-comment.gif" alt="" /> {COMMENTS_ROW_ORDER}.</a>
{PHP.themelang.comments.Postedby} {COMMENTS_ROW_AUTHOR}</span> {COMMENTS_ROW_DATE} {COMMENTS_ROW_ADMIN} {COMMENTS_ROW_EDIT}
<p>{COMMENTS_ROW_TEXT}</p><hr />
<!-- ENDIF -->
<!-- END: COMMENTS_ROW -->
As you can see, I changed the background-color and I added user avatar instead of comments icon. You can do much more
Note: it's recommended not to use direst styling inside your templates. Use CSS classes instead!
Разделы: Documentation / Extending Cotonti / Extensions
Those familiar with building or modifying Cotonti templates will have seen and used template tags. Tags are short bits of code which, when parsed by XTemplate, are replaced by a block of HTML code. This ensures your template file exists only of HTML code. Any PHP generated code is handled by the plugin and parsed using a tag.
When developing a plugin, it’s important to know how to define tags and conditional blocks with the XTemplate system. Before, most plugins used the legacy way of getting HTML to be parsed and displayed. Although using XTemplate and your own template file is a much nicer way to build your plugin, you can still use the classic way for standalone plugins. You do this by using the variables $plugin_title, $plugin_subtitle and $plugin_body. These are assigned automatically to the tags {PLUGIN_TITLE}, {PLUGIN_SUBTITLE} and {PLUGIN_BODY}. In this case, you don’t need to create your own template file (and you can omit the tpl directory). Cotonti will use the skin’s plugin.tpl instead.
So you want to use your own template file. You start by defining the template file as a new XTemplate object. That’s right, the XTemplate system is an object oriented piece of code. Once you’ve created a new XTemplate object, you can use a collection of methods (functions) supplied by the XTemplate class. We will be using just two of them: assign() and parse(). First we create a new XTemplate object:
$t = new XTemplate(‘path/to/file.tpl’);
We are using $t as the XTemplate object variable name, but you can use any variable name you like. The ‘path/to/file.tpl’ is the path to the template file, from the Cotonti root folder. While this would work perfectly fine, it’s not a very flexible way to define the template file. Therefore we will use the cot_tplfile() function instead, like this:
$t = new XTemplate(cot_tplfile('pluginname', 'plug'));
The first parameter is the filename without extension. The second parameter must be set to'plug', since we’re dealing with a plugin. Other possible values are 'module' and 'core'. The cot_tplfile() function will look up the correct path to the template file. The filename must always start with the pluginname. If you want to use multiple template files, you should use filenames like this: pluginname.secondary.tpl. Remember to omit the extension when using cot_tplfile().
The next step is to assign some tags to your template file. We do this by using the assign() method on our XTemplate object:
$t->assign();
The assign() method can take single tags or an array of tags:
$t->assign('SINGLE_TAG', '<p>Piece of HTML</p>'); $t->assign(array( 'TAG_ONE' => '<p>Piece of HTML</p>', 'TAG_TWO' => $somevariable ));
As you can see, it’s very simple to assign a bunch of tags with PHP generated content. While it’s a good way to implement the MVC design pattern, it’s still not very flexible. What if you want to display multiple rows of content from your database? XTemplate uses HTML comments and the parse() method to allow this. Lets say you just executed an sql query to get all pages. Likely you’ll be using a while loop to go through the rows. Consider this code:
while($row = $sql->fetch()) { $t->assign(array( 'PAGE_ROW_ID' => $row['page_id'], 'PAGE_ROW_TITLE' => $row['page_title'] )); }
This would redefine the tags every time we go through the while loop, and result in the tag to be set to the last row’s value. To prevent this, we need to force parsing the tags directly after defining them. This is achieved with the parse() method.
$t->parse();
The parse() method takes one parameter: the block code. The block code is a unique code that is placed inside the template file as an HTML comment. It always has a BEGIN and END, like this:
<!-- BEGIN: BLOCK_CODE --> ... <!-- END: BLOCK_CODE -->
You may have noticed that every Cotonti template file starts and ends with such a tag, effectively defining the entire document as a block. Usually this is the MAIN block, but you can use another if you really want to.
In the plugin PHP code, we will now add the parse() method to the while loop:
while($row = $sql->fetch()) { $t->assign(array( 'PAGE_ROW_ID' => $row['page_id'], 'PAGE_ROW_TITLE' => $row['page_title'] )); $t->parse('MAIN.PAGE_ROW'); }
The block we've just defined is named ‘PAGE_ROW’, but because it is to be used within the MAIN block, we prepend the block name with the parent block name and a dot to separate them. Our template file could now look like this:
<!-- BEGIN: MAIN --> <h1>{SINGLE_TAG}</h1> <!-- BEGIN: PAGE_ROW --> <p>{PAGE_ROW_TITLE}</p> <!-- END: PAGE_ROW --> <!-- END: MAIN -->
If you don’t want or can’t use the MAIN block, you can replace it with another code. However, this will require you to do one more parse at the end of the plugin code. The MAIN block is automatically parsed by Cotonti, but any other blocks will need to be parsed manually by your plugin. Simply call the parse method again, and finally output the block (for standalone):
$t->parse('ALTERNATIVE'); $t->out('ALTERNATIVE'); // Only for standalone
It’s best to do this right before the PHP ending tag.
Разделы: Documentation (Genoa and older) / English / Skins
You can include another .tpl file in the theme files using this code:
{FILE "themes/YOUR_THEME/myfile.tpl"}
We're gonna create reminder.tpl and put it in themes/mytheme folder.
This is the code:
<div class="block">
<img src="theme/{PHP.theme}/img/newsletter.png" width="64" height="64" alt="" />
Please, don't forget to sign up for our Newsletter!
</div>
Notice that this .tpl file doesn't have beginning and ending template blocks (e.g. <!-- BEGIN: MAIN --><!-- END: MAIN -->)
This .tpl file (reminder.tpl) can be included in any .tpl file.
For the purpose of this "tutorial", I included it in 3 files: page.tpl, list.tpl and forums.sections.tpl
You simply have to place this code :
{FILE "themes/mytheme/reminder.tpl"}
where you want it to appear.
And this is my output:
P.S. If you don't see any changes make sure you cleaned the "Disk cache" ( Administration > Other > Disk cache > Purge all )
Pages can pickup the content of an HTML file as body of the page. You simply have to place this line in page text (in MarkItUp or in CKEditor Source mode):
include:mytext.html
Don't forget to place mytext.html file in datas/html folder
Otherwise this won't work.
1. External HTML file is using CSS file from your theme. e.g.
<html>
<head></head>
<body>
<div class="block">
This block will be using css class from themes/mytheme/mytheme.css
because my default theme is mytheme
</div>
</body>
</html>
2. Include tag must be the only thing entered in page text
HTML file will be included in this case:
But it won't work in this case:
love.html code: (used in examples above)
<html>
<head>
<title>HTML Include</title>
</head>
<body>
<div class="block">
<strong>I'm an external HTML file included in this page! Beware!</strong><br />
Lorem ipsum dolor sit amet, consectetur adipiscing elit.
Quisque fermentum massa eu quam pellentesque quis dapibus nisl tincidunt.
Sed augue lectus, consectetur quis sollicitudin ac, pulvinar sit amet nulla.
Mauris a purus mattis nulla eleifend condimentum.
Nullam leo diam, mollis at tempus vel, fermentum a justo.
Donec eget erat augue, vel porta lorem.
Praesent tristique tortor ac nulla aliquam non varius lectus dapibus.
Morbi consectetur ante ut dui consequat vel placerat neque congue.
Maecenas rutrum pharetra viverra. Nam ut augue.
</div>
</body>
</html>
3. There can be only one include per page
4. Function is space sensitive
Valid code:
include:mytext.html
Wrong code:
include: mytext.html
You can also redirect to an URL.
Example:
redir:mypage.html
And when you click on the page which has this code in page text, it will automatically redirect you to mypage.html
Note: You'll have to use direct URL to edit the page which has "redir:" in page text.
Example:
http://www.yoursite.com/page.php?m=edit&id=1
1. You can only point to another page on your website.
Valid code:
redir:page.php?id=1
Wrong code:
redir:http://www.cotonti.com
2. Function is space sensitive
Valid code:
redir:page.php?id=1
Wrong code:
redir: page.php?id=1